
THE SKIN TONE, ALSO CALLED UNDERTONE , IS DIFFERENT FORM THE COMPLEXION, WHICH IS THE SHADE OF THE { LIGHT,MEDIUM,DARK } .THE UNDERTONE WILL REMAIN THE SAME NO MATTER HOW MUCH SUN YOU GET, EVEN IF YOU”RE PALE IN THE WINTER AND TAN IN THE SUMMER.
1.2 SKIN TONES
THERE ARE THREE DIFFERENT UNDERTONES COOL,WARM, AND NEUTRAL. KNOWING THE CLIENT’S SKIN TONE CAN BE HELPFUL IN MANY WAYS-IT CAN HELP YOU CHOOSE THE RIGHT LIPSTICK COLOR,FIGURE OUT WHICH HAIR COLOR IS MOST FLATTERING, AND KNOW WHICH COLORS YOU SHOULD SELECT.
A . COOL SKIN TONE: PEOPLE WITH COOL TONE HAVE A LITTLE PINK {ROSINESS} IN THEIR SKIN. THEY TEND TO BURN EASILY UNDER THE SUN. THEY LOOK GOOD IN SILVER JEWELLERY & ACCESSORIES. MOST OF THE TIME ,THEIR VEINS ARE IN THE BLUE COLOR {TAKE A LOOK AT THE WRIST UNDER NATURAL LIGHT.
B. WARM SKIN TONE : THE SKIN HAS A YELLOW UNDERTONE OR GOLDEN- OLIVE UNDERTONE, THEY TEND TO TAN EASILY UNDER THE SUN. THEY LOOK GOOD IN GOLD JEWELLERY & ACCESSORIES THAN SILVER . MOST OF THE TIME, THEIR VEINS ARE IN GREEN COLOR { TAKE A LOOK AT YOUR WRIST UNDER NATURAL LIGHT}.
C. NEUTRAL SKIN TONE : THE SKIN HAS BOTH PINK AND GOLDEN UNDERTONE. THEY LOOK GOOD IN BOTH GOLD OR SILVER JEWELLERY. MOST OF THE TIME THEIR VEINU IS IN BOTH BLUE- GREEN COLOR.
HOW TO CHECK THE CLIENT S SKIN TONE
USE GOLD AND SILVER FOIL OR JEWELLERY TO FIND YOUR CLIENTS SKIN TONE . HOLD A SHEET OF GOLD FOIL IN FRONT OF HER FACE SO THAT IT REFLECTS LIGHT BACK ON HER SKIN . NOTE WHETHER IT MAKES HER SKIN. THEN TRY WITH A SHEET OF SILVER FOIL.
A . IF THE GOLD FOIL LOOKS BEST , SHE HAS A WARM SKIN TONE.
B . IF THE REFLECTION FORM THE SILVER FOIL MAKES THE SKIN GLOW , SHE HAVE A COOL SKIN TONE .
C . IF YOU DON’T NOTICE A DIFFERENCE { BOTH SILVER AND GOLD ARE FLATTERING }, THEN SHE LIKELY HAVE A NEUTRAL SKIN TONE.
IF YOU DON’T HAVE GOLD OR SILVER FOIL , TRY LAYING GOLD AND SILVER JEWELLERY ON THE WRIST, AND NOTICE WHICH ONE IS MORE FLATTERING.
1.4 HOW TO SELECT SHADE ACCORDING TO TONE
WARM SKIN TONE COOLSKIN TONES
PEACHES ROSY PINKS
PEACHY PINKS BLUES
ORANGE BLUE GREENS
CORAL PURPELS/VIOLETS
RED-ORANGE DEEP BLUE BASED REDS
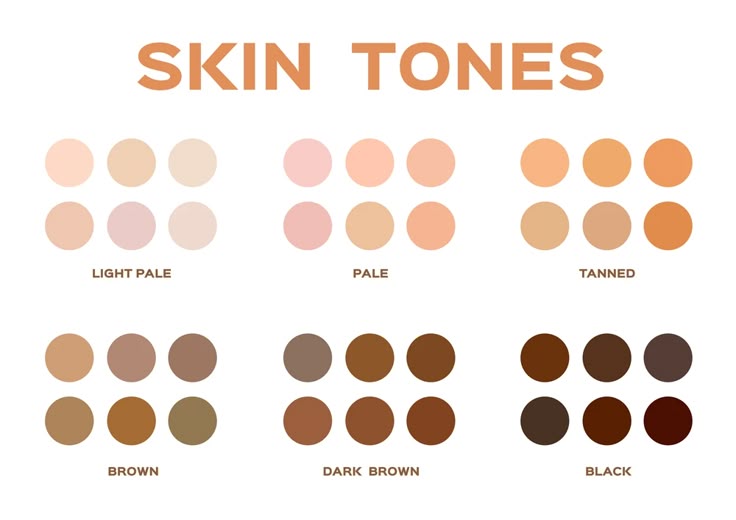
SKIN COMPLEXIONS
COMPLEXION IS THE NATURAL COLOR AND APPEARANCE OF A PERSON’SKIN , ESPECIALLY OF THE FACE .DIFFERENT COMPLEXIONS FOUND IN INDIA ARE:
A .FAIR SKIN : LIGHT LVORY, PORCELAIN, SAND, PALE PEACH PINK OR SLIGHTLY REDDISH [ROSY} UNDERTONES
B. MEDIUM SKIN : YELLOW, GOLD, BEIGE, NATURAL,RED-OLIVE, YELLOW- GREEN
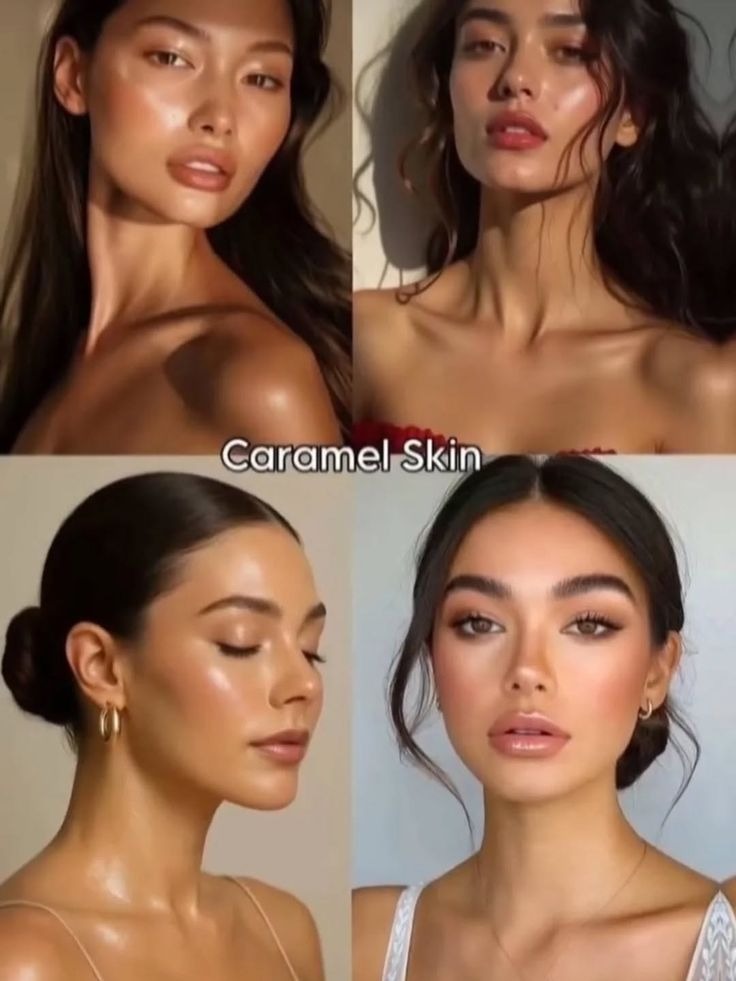
C . MEDIUM – DARK : SKIN – HONEY, COPPER , OLIVE , TAN , GOLDEN – OLIVE, CARAMEL
D . DARK SKIN ; ORANGETH- BROWN , RED- BROWN, WALNUT, ALMOND, BLUE- BLACK, EBONY, DARK CHOCOLATE
CONTOURING & CORRECTIONS
CONTOURING & CORRECTIONS IS WHEN YOU USE A MATTE POWDER, LIQUID, CREAM OR STICK PRODUCT THAT’S A FEW SHADES DARKER THAN YOUR SKIN TONE TO SHADE AREAS YOU’D LIKE TO DEFINE OR RESHAPE’ LIKE YOUR NOSE,FOREHEAD, CHIN,AND CHEEKBONES.IT’S A TECHNIQUE THAT WAS POPUARIZED BY CELEBRITY MAKEUP ARTISTS IN 1800s – 1900s.
LIPS SHAPES AND CORRECTIONS
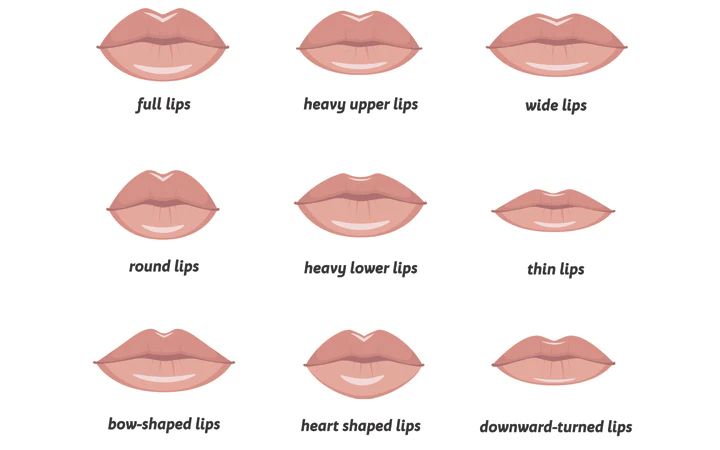
SMALL MOUNTH WITH SMALL LIPS These are easily corrected by taking the lip liner outside the natural lip liner. work slowly and steadily to form a perfect shape. fill the lips inside the line you have drawn. use glossy colors.
LARGE MOUTH WITH FULL LIPS. apply liquid foundation makeup to the entire mouth, then outline with a dark shade of lipstick just inside the natural contours of the mouth. apply lipstick of a lighter shade carefully and accurately within this outline. subdued shades work well for this kind of mouth. use medium toned lip colors and avoid dark browns, plums, electric bright or pale shimmer shades.
FULL UPPER LIP apply fluid foundation makeup to the upper lip. outline just inside its natural contour and apply a dark shade of lipstick . then outline the lower lip just outside its natural contour and emphasize by filling in with a lighter shade of lipstick.
FULL LOWER LIP outline upper lip just outside its natural contour. apply a light shade of lipstick in the center and a touch of lip gloss. apply fluid foundation makeup to the lower lip. outline just inside its foundation makeup to the lower lip. outline just inside its natural contour. then fill in with a darker shade of lipstick , using a lip brush.
WIDE MOUTH Cover the corners of the mouth with foundation makeup or a cover stick . apply lipstick with a lip brush, stopping a few millimeters before the corners of the mouth are reached.
THIN LOWER LIP Line just outside the lower lip to make it appear fuller. fill in with lip color to balance between the lower and upper lips.
THIN UPPER AND LOWER LIPS Outline the upper and lower lips slightly fuller, but do not try draw for over the natural lip line. use a lighter color to make lips appear larger.
CUPID BOW OR POINTED UPPER LIP To soften the peaks of the upper lip, use a natural- color liner to draw a softer curve inside the points. extend the line to the desired shape. fill in with lip color.
DROOPING CORNERS Line the lips to build up the corners the mouth. this will minimize the drooping appearance. fill in lips with the soft color.
UNEVEN LIPS Outline the upper and lower lips with a soft color to create the illusion of matching proportions. NOTE: outline the lips with a long- wearing lip pencil and then fill in with an extended wear lip color to keep lip color from running into fine. lighter color work better and do not show the lines as much as dark or red colors do.
NOSE SHAPES AND CORRECTIONS
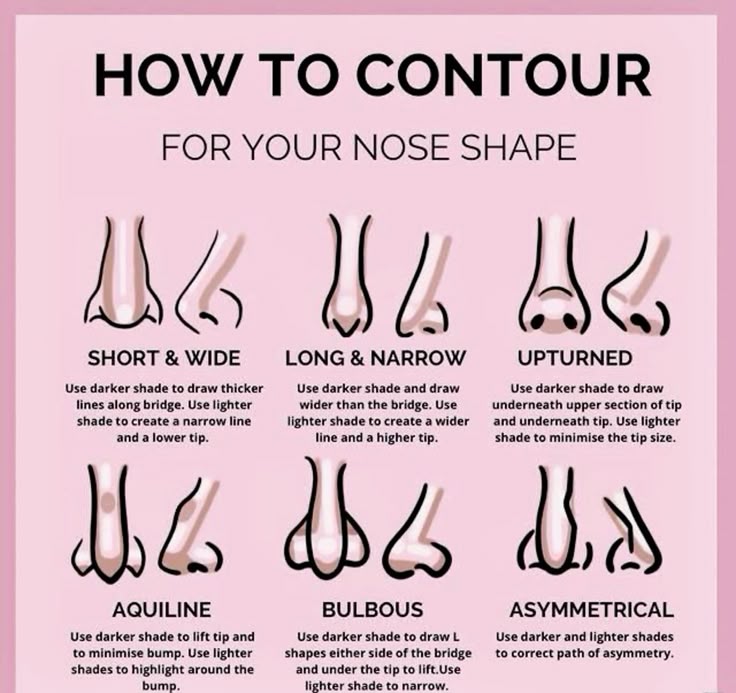
LONG WIDW NOSE Apply darker shade of foundation on either side of the bridge of the nose. extend down along each side of the nose and blend. extend contour down, between, and around nostrils, covering lip of the nose and blend.
WIDEN A THIN NOSE Apply lighter shade of foundation down the sides of the nose and blend. if the nose is too sharp and pointed, apply a darker shade on and under the tip of the nose and blend.
SOFTEN A BUMP Apply darker shade of foundation directly on bump and blend. apply lighter shade of foundation on either side of bump from bridge to nostrils and blend.
STRAIGHTEN A CROOKED NOSE Apply darker shade of foundation on to the bulging side of the nose and blend. on the opposite side of the nose, apply a lighter shade and blend.
SHORTEN A LONG NOSE Apply darker shade of foundation to lip and underside of nose. extend contouring down, between, and around nostrils. highlighting is not needed because foundation on the lip of the nose will be a highlight.
EYEBROW SHAPES AND CORRECTIONS To get the “ideal” brow draw three imaginary lines: A. a vertical line alongside the inner corner of the eye and side of nose (this is where the inner brow should end) B. a vertical line on the outside edge of the iris ( this is where the highest point of the arch should be) C. a diagonal line starting at one corner of the nose and crossing the outer corner of the eye on the same side (line will extend past the brow to indicate where the brow should end)
CORRECTIVE MAKEUP TIPS FOR EYEBROWS A. high arches make you face appear more narrow, which could be a good thing for a round face, but not as desirable for a face that’s already very narrow. to adjust a high arch, remove extra hair from its top and fill- in under the eyebrow with pencil or shadow. B. add visual height to a low forehead by decreasing the arch. C. make your eyes appear further apart by widening the distance between the brows and extending the brows slightly outward.
EYE SHAPES AND CORRECTIONS
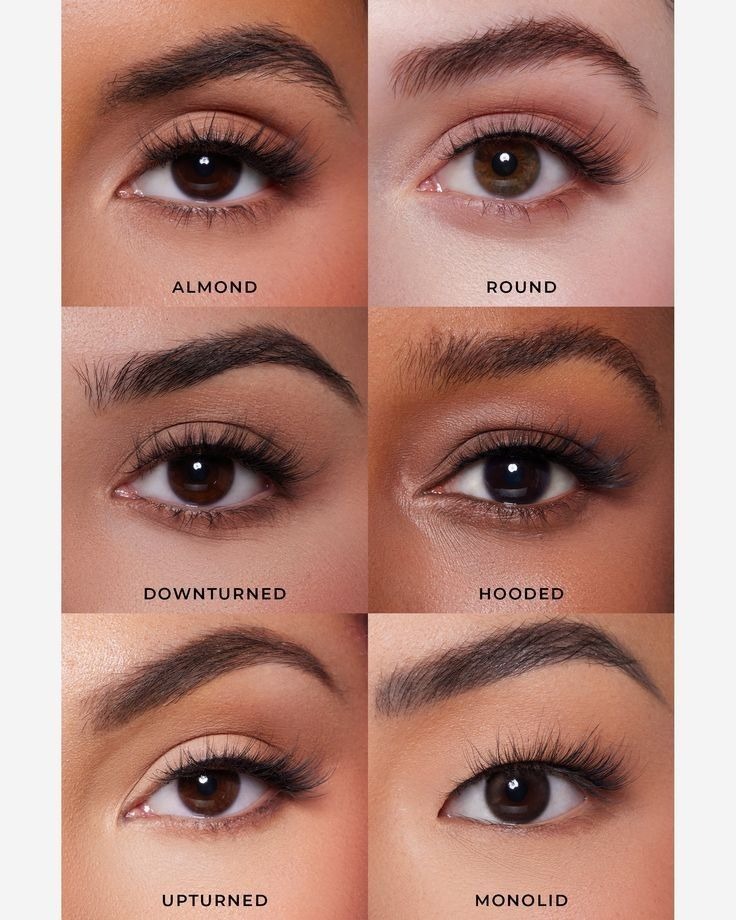
Different Eye Shapes there are nine basic eye shapes, each one offering different to focus on. the nine different eye shapes are: A. ALMOND SHAPED EYES: this one is pretty straight forward. this type of eye is considered to be the ideal shape. it is characterized by eyes that are shaped like almonds. any eye shadow technique will work on almond shaped eyes.
B. CLOSE SET EYES: you have close set eye and the inside corner of the other eye is less than the width of one eye apart. apply medium to dark eye and lighter to medium shades on the inside corner of the eyes.
C. DEEP SET EYES; deep set eyes sit further back in the eye socket than most eyes. those with deep set eyes will also have a small mobile lid over the eye. apply lighter eye shadow on the lids.
D. DOWN TURNED/ DROOPY EYES: down turned eyes are, quite simply, turned down on the outer corners. if the outer corners of your eyes are lower than the inner corners of your eyes, you have down turned eyes. apply eye shadow higher on the lids and try to avoid defining lash line which can drop them down turned eyes. apply eye shadow higher on the lids and try to avoid defining lash line which can drop them down more.
E. HOODED EYES: hooded eyes are common in older women. this eye shape has a small fold of skin that hangs over the socket line and often partially over the lid as well. lightly dust dark, shadow all over lid.
F. OVAL EYES: oval eyes are pretty easy to spot. they’re shaped like ovals. length of eye is shorter than almond eye. any eye shadow technique will work on almond shaped eyes.
G. PROTRUDING EYES: protruding eyes can be a little difficult to work with. thanks to the bulge that runs from the socket to the lash but there are things you can do to make protruding eyes look fantastic. avoid a crease cut and go for a nice smokey look to push eyes back.
H. WIDE SET EYES: you have wide set eyes if the distance between the inside corner of one eye and the inside corner of the other eye is more than the width of one eye apart. bring your eyes closer by applying dark shadow on the inner lid. try to avoid defining the outer corners too much.to,
AsianEyes/flateyes:These eyes are flat. Eye lid is not visible. Correct them by defining a dark line to make a lid.
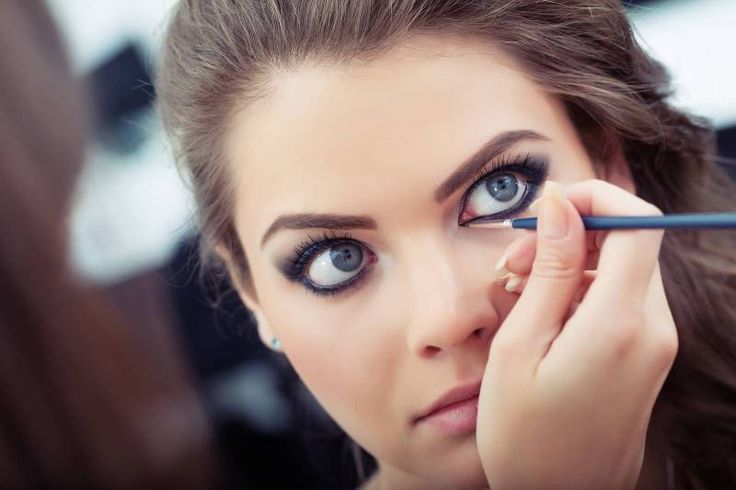
Eye liner is a cosmetic used to define the eyes. It is applied around the contours of the eye(s) to create a variety of aesthetic effects.
Eye liner is commonly used in a daily make-up routine to define the eye or create the look of a wider or smaller eye. Eye liner can be used as a tool to create various looks as well as highlighting different features of the eyes. It can be placed in
various parts of the eye to create different looks with a winged eye liner or at the waterline. Eyeliner can be drawn above upper lashes or below lower lashes or both, even on the water lines of your eyes. Its
primary purpose is to make the lashes look lush, but it also draws attention to the eye and can enhance or even change the eye’s shape Eye liner is available in a
wide range of hues from the common black, brown and grey to more adventurous shades such as bright primary colors, pastels, frosty silvers and golds, white and even glitter-flecked colors.
wide range of hues from the common black, brown and grey to more adventurous shades such as bright primary colors, pastels, frosty silvers and golds, white and even glitter-flecked colors.When using a pencil liner, you will need to
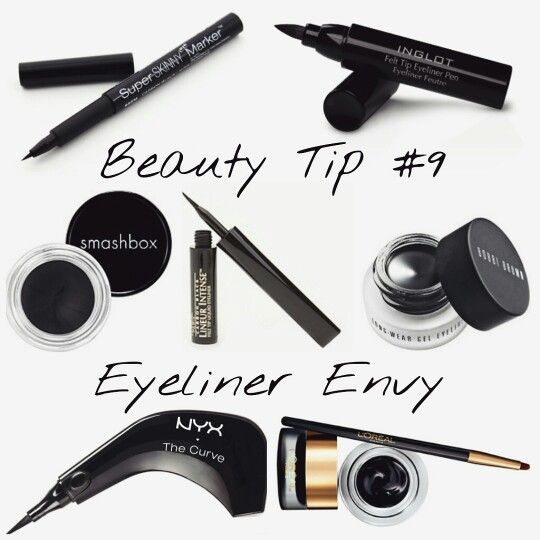
EYELINERS
INTERNATIONAL
ChoosingaLiner
Introduction
here are a variety of Eyeliners available in the market. They come in three forms Pencil eyeliner, Liquid
eyeliner and Gel eyeliner.
- Pencil Eyeliner
They are easy to use and apply. You can lightly apply the pencil for a subtle, natural look, or you can smudge your pencil to create smokey or dramatic eyes. It also won’t run into your eyes like liquid liners
can occasionally sharpen dull pencil.HowtouseaPencilEyeliner
To sharpen the pencil, use an eyeliner pencil sharpener to make the pencil as sharp as you want it to be or to dull the pencil, gently rub the tip of the pencil on a tissue until it is to the desired level of dullness.
A hard/cool pencil will provide a softer, lighter application. A soft/warm pencil will provide a darker ,more pigmented look
In winters you can warm up your liner pencil by using a hairdryer on your eye Pencil for seconds. This will soften up the liner enough to give it a gel-like consistency. Then, test the liner on your wrist before you apply it to your eye.
Begin lining the inner corner of the eyelid and move towards the outer edge of the eyelid. Make sure that you go slowly and use short strokes to create an even line.
f you want to make the eyes look bigger and more open, then you may consider applying a lighter
color just to the inner corner of the upper lash line. For example, you could use a cream-colored liner on the inner corners and a brown colored liner on the outer corners. i. Use an angled brush for blending if you are combining more than one color. If you want a natural look, then you might consider tight lining the eyes. To tight line eyes, only apply the eyeliner to the spaces between your lashes on your upper lid. This will accentuate your eyes without creating a dramatic line.
You can tight line the upper and/or lower lash line.
11. For an even more natural look, try tight lining the eyes with a neutral shade, such as light brown.
ApplyingPencilEyeliner If you decide to line the lower lid, place a finger on the outer edge of the lower lid and pull it taut. Then, begin applying liner using short strokes, just as you did with the top lid.. Line the entire bottom lash line for a dramatic look. Lining the entire lower lash line along with your upper lash line will make your eyes look even more dramatic, though it will also make them look smaller.
You can also use a lighter shade of eyeliner for the lower lash to make the effect a bit less dramatic. For example, you could use a light brown shade on your lower lash line.
Line just the outer half of the lower lash line for a subtler look.
- Liquid Eye liners
You can find liquid liner in either a marker pen or in a vial with a brush. To use it, you simply draw on your lines and fill in any gaps with a second application of liner. You can create a wide range of lines from liquid liner, from thin, natural lines to dramatic looks. Liquid liner creates smooth, swooping lines and a precise look.Liquid liner marker pens are very easy to use.
11. If you use a vial and brush, it may take some practice to learn how to use the liquid liner.
out of the bottle. If the brush seems to have too much liner on it, then swipe it across the edge of the liner bottle Start in the middle by placing the brush against the upper lash line so that it is as close as possible to the eyelashes. Then, begin applying eyeliner to the upper lash line. Move out towards the outer edge of the lash line. Start in the middle by placing the brush against the upper lash line so that it is as close as possible to the eyelashes. Then, begin applying eyeliner to the upper lash line. Move out towards the
outer edge of
the lash line.
Start in the middle by placing the brush against the upper lash line so that it is as close as possible to the eyelashes. Then, begin applying eyeliner to the upper lash line. Move out towards the outer edge of the lash line. Now fill in the gaps. After you have finished lining the outer corner, line the inner edge of your upper lash line and connect this line up with the first line you made. Use small strokes to connect your lines and fill out as needed so that you have one solid, even line on your upper lash line.
Wings are optional with liquid liner but adding wings can intensify your look. If you want to create a winged look, then just follow the curve of your outer lash line upwards and form the outer corner of your eyelid. Then, fill in the wing as needed. Try creating just a small wing if you do not want to look too dramatic or go for a longer wing for a high drama look. You can the edge of a small card to help you create a straight line for the wing. Just place the
card against the outer edge of the eyelid at an angle and trace along the edge with the liquid liner.
- Gel Eyeliner
Gel liner comes in a pot along with a small brush. Its thicker formula looks great for dramatic looks like cat eyes and wings. The brush makes it easy to use.
- You can use other brushes with your liner. You may find that an angled brush works best for applying the liner.
- Be sure to clean the brush often to help prevent eye infections.
How to use a Gel Eyeliner
- ApplyingGelEyeliner Dip the liner brush into the gel liner so that just the tip or edge is coated in gel liner. Gel liner can dryout quickly, so make sure that you close the lid as soon as you are done using it. If it seems a little dry or stiff, then you warm the pot in your hands to make it easier to use.
- Another option is to create several dots along your lash line and then connect the dots to create a line.
- After you have starter lines on the inner and outer edges, then you can fill in the gap along the center of the lash line. Use soft small strokes to create an even line along the upper lash line. To ensure that the line is even, you may need to go overit several times.
- Try blending some eyeshadow along the edge of the liner to create a smoky or smudged effect
- False eyelashes are a relatively new trend in the world of makeup. False eyelashes are a great option for individuals who may think their own lashes are too short or not full enough, even with the aid of mascara. For those in the theater and entertainment world, false eyelashes are a must. They add volume to the eyelashes and give the eyes a dramatic look. Hence, this is a boon for people who have very thin or small eyelashes. Today, false eyelashes are available in a wide variety of styles, sizes and types.
- There are 4 main types of false eyelashes: Strip lashes, individual flare lashes, individual single lashes and Colored or fancy eyelashes.
- Strip Lashes
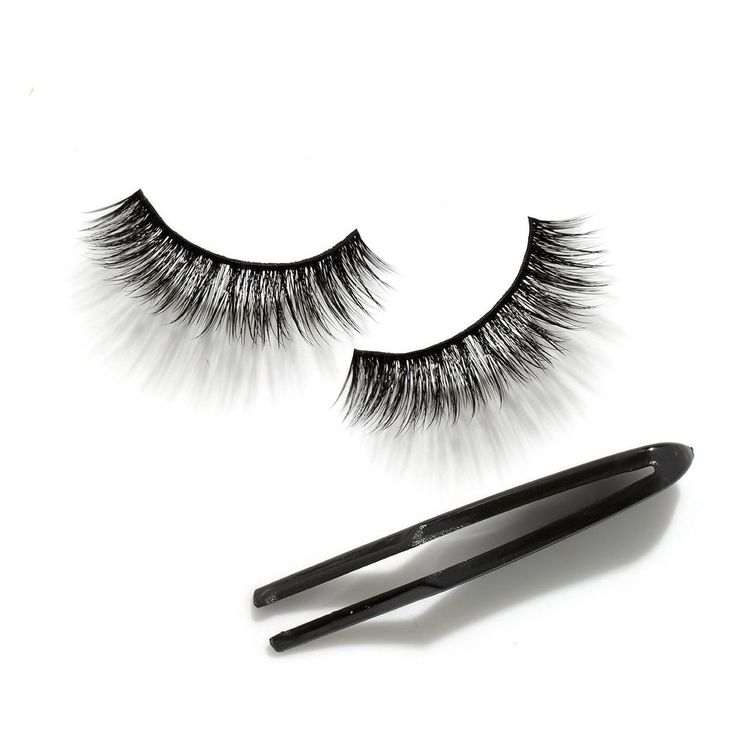
StripLashes These are the most convenient ones in terms of application. These are pre-made extensions that can be directly applied on to the original eyelashes. They can help in making the eyes look fuller, as well as bigger. However, they do not give a natural look to the eye, and people can easily make out they are
fake.
- Individual Flare or Cluster Lashes